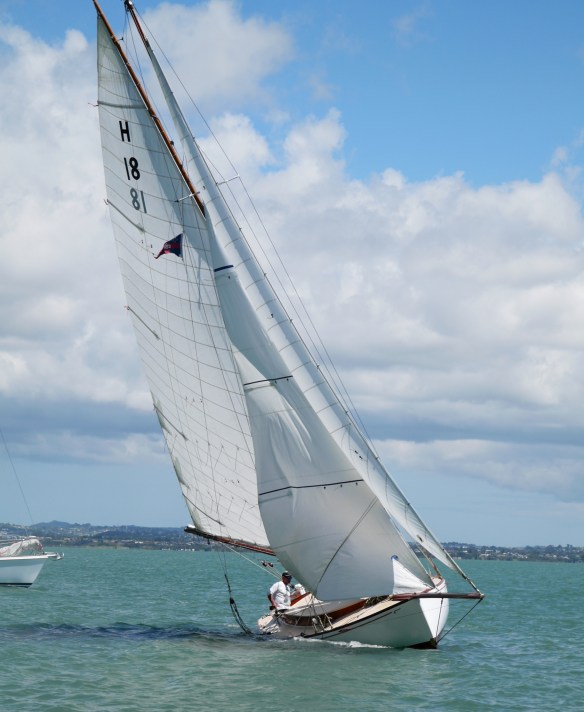
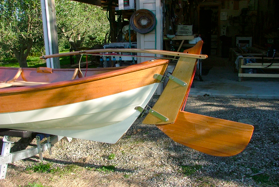
Electro-Chemical Damage In Wooden Boats Update – Revisited

rudder electrochemical damage


ELECTRO-CHEMICAL DAMAGE IN WOODEN BOATS UPDATE
A Special Post By Chris McMullen

Recently I received a note from Chris where he questioned if the story we posted last year on ww about electro-chemical damage to wood  was a little too long & were people reading it. Well I can tell you that the post is the single most visited story on ww, ever, & gets read by people all over the world. Its frequently referred to on the hugely popular WoodenBoat Forum in the USA. The link below takes you to the original story.

Electrochemical Damage To Wood – the marine version of ‘leaky homes’

For the impatient ones out there 🙂 Chris has done a ‘Readers Digest’ version & refers to a vessel that recently featured on ww.
I encourage all of you to read today’s story & if you own a classic wooden boat – read both versions – the problem is the biggest risk to the life of our classic boats.

In Chris’s words:
“I received the above disturbing images of another woody being destroyed by an owner who I believe is unintentionally loving his boat to death.

The use of anodes and bonding on a wooden boat is fatal. The cathode or protected metal makes hydrogen gas and this combined with saltwater makes Sodium Hydroxide (Caustic Soda). This chemical is used to pulp wood in the paper making industry. Not on my boat thank you! I say again, there is no reason to use anodes and bonding on any boat. The only exception, steel hulls require anodes. If copper or bronze are being corroded it is due to a positive DC leak and Zinc anodes will not help. Find the electrical leak is the cure. If there is brass or manganese bronze underwater it will corrode due to the
zinc in the alloy. Anodes will possibly stop the corrosion but at the expense of wood damage. A better plan is to replace the brass with proper marine bronze.

Bronze and copper should last indefinitely in the sea. To prove that statement, I ask you to look at the Roman coins and artifacts salvaged from ships wrecked in the fourteenth century. There was no anodic protection and the metal is well preserved. So what is the difference to the copper and bronze on your boat? There is absolutely no difference so why waste your money buying anodes that will in time destroy
your wooden boat.

Three or four bottles of wine will cost the same as anodes and will make you and your boat happier.”

Note: ww is read all around the world, if there is water & boats, there are people reading ww. So a little about the man for non kiwi’s  – Chris is one of NZ’s most respected boat builders (retired) and at one time was the Lloyds (Honorary) Wood Boat Surveyor in Auckland. Chris’s (the original company) ‘McMullen & Wing’ built and repaired wood, steel and marine aluminium vessels. They built the first welded aluminum vessels in NZ. Chris is the current holder of the Classic Yacht Association of New Zealand ‘Outstanding Achievement Trophy’ for services to classic boating.

14-05-2016 Photo Update
Gavin Gault sent in the below photos of a Nova skeg floor that he believes were probably damaged due to engine – anode bonding failure. Pretty graphic !!


10-07-2016 Reply from Chris McMullen

“Wow. Thank you Gavin Gault for sharing your very graphic images. Very sad, small consolation but yours will not be the only wooden boat affected by this scourge.
Maybe, at last some of the Flat Earth Society will start to believe what I have been saying. The worst detractors are some in the Marine Industry who have been preaching the Anode, Bonding party line for years.  Now there is no where to run for cover,  they continue to conjure up excuses and it seems, refuse to accept a simple scientific fact.
“If you have a positive and negative electrode in salt water, the negative cathode or protected metal makes hydrogen gas and this combined with salt water makes Sodium hydroxide.”
This chemical is also known as caustic soda and removes paint and destroys wood.  There is no doubt about this fact. You do require a power source and bonded dissimilar metals ( zinc and copper) provide sufficient current to do the damage, but slowly.
If there is a negative DC leak (to the sea)on a bonded boat the process is accelerated. If there is a positive leak any metal becomes an anode and will waste away. It is important to isolate the DC power from contact with the sea. Again bonding is just asking for trouble. Please remove Anodes and Bonding from your wooden boat now!
Chris McMullen”

06-09-2106 In case you were not to sure what to look out for – the below photo should be a wake-up call to a few woodys 😉

IMG_1120


New Zealand Classic Wooden Boat Register – 200+ Photos

image1

New Zealand Classic Wooden Boat Register – 200+ Photos

Stoked to be able to share with you the 2018 edition of the CYA Classic Register. Big ups to the CYA team behind it, pulling everything together is a massive undertaking, I’ve been there & done that, having been involved with the first 4 issues – 2018 is a winner, so make a cup of coffee or pour something a little stronger & sit back & enjoy over 200 photos. Click link below

to view https://www.yumpu.com/en/document/fullscreen/59612422/cya-classic-register-2018-yum

Lucky CYA members will be getting a free hard copy version in the post very soon. Almost worth joining to get a copy 😉 Membership details here  http://classicyacht.org.nz/joinus/

Mystery Clinker & Engine

Screen Shot 2017-12-13 at 4.47.14 pm

Screen Shot 2017-12-13 at 4.49.59 pm

MYSTERY ENGINE

In the latest Lake Rotoiti Wooden Boat Association newsletter, one of the members, Andy Hammond, was looking for help to ID the engine in his 14’ clinker run-about.

Andy commented that the engine was a proper marine unit with F & R gearbox, and almost certainly “Made in England” as it says so on the fuel filter housing. Also has A/F spanner sizes.

Any woodys able to help Andy out on the engine? & what do we think about the design of the boat?


Nukutere – Part 2

Construction & Launching

Unknown

Unknown-5

1940’s War Service & Up To About 1950’s

Unknown-23

Unknown-10

1960’s > 1981

Unknown-13

Unknown-15

Unknown-16

Unknown-18

Unknown-22

NUKUTERE – Part 2

Back in September (11th 2017) I wrote a story on WW about the launch Nukutere, as a result of that story Bernie Warmington made the comments below on the WW Comments section

“Hi, the lovely Nukutere was built by Arthur Sang for our grandad Foster Warmington of Wellington, from 1939-41.  She remained in the family until 1981.  Grandad sketched up some design drawings from reading boating magazines and Arthur made up a model.  (Grandad then shaved the model to make the bows finer, Arthur didn’t find out until she was partly built!).  Moored mostly at Port Nicholson and then later at Seaview, and in the Sounds she was moored at Nana and Grandad’s house in Double Cove.  She saw naval service as Frank mentioned, her registration was Z74.  My Dad Gavin and Uncle John went on night patrols when 14 and 15 until the navy banned them due to age.  Not sure what Nana thought of all this… We have a small book based on Dad’s memories of the Nukutere and her adventures, happy to share these, photos etc with the current owners and others interested.”

I asked Bernie to send me the above mentioned photos, which appear above. What a collection – I have broken them into 3 parts.

  1. Construction & Launching (stunning photo of the kauri log)
  2. 1940’s War Service & Up To About 1950’s
  3. 1960’s > 1981

THE NUKUTERE STORY – Below is a link (in blue) to a photo-essay book, titled The Nukutere Story, that Gavin Warmington authored for his family. The story & photos were passed over (told) to his children – Julie, Bernie & Matty in late 2007 > early 2008.

The family edited the story & published it in March 2016. WW is in debt to the Warmington family for sharing the book with all us woodys.

Enjoy the read, it puts all the above photos & more in context.

THENUKUTERESTORY

Screen Shot 2017-12-14 at 7.53.40 am


Link to the WW post #1 showing Nukutere today.  https://waitematawoodys.com/2017/09/11/nukutere/


A Master Class in Wooden Boat Building


A Master Class in Wooden Boat Building

In the past I have published several links to retired Australian boat builder, Ian Smith’s blog (Smithy’s Boatshed) on the building of his 24’ Ranger Class yacht. Today’s link is to the full blog; it is a truly amazing record of how to build a wooden boat. If Ian was to appear on the TV program Mastermind, his specialist topic would be ‘Australian Open Boats’, the man is a living legend. Read / view the story, if you are too busy, bookmark it for later reference.

(thanks to Robin Elliott for pointing me in the direction of Ian’s build / blog)  

http://smithysboatshed.weebly.com/blog


Rawene – A Peek Down Below

Unknown-6

Unknown

RAWENE – A Peek Down Below

Woody John Wicks sent in the above photos of the launch Rawene. They came from a friend of John’s, who got them from his brother on Tauranga, so the details were a little light e.g.  only the name & the date 1926.

This Rawene (there have been a few) has appeared on WW before when she lived on Lake Waikaremoana, looks like she is being hauled after receiving some TLC, as mentioned below in the owner’s comments. Great to see below decks.

Link here to when she first appeared on WW, I in fact had suggested that she had to be a finalist for the 2016 Floating Bach Awards 😉 https://waitematawoodys.com/2016/05/21/2016-floating-bach-award/

Below I have reproduced Hendrik Metz’s WW comments on the vessel.

Keen to hear more about what happened to with her while she was out & if she did make it back to the Lake?

Rawene – as told by owner, Hendrik Metz

Built in 1928 by L.C. Coulthard, Boatbuilder of Onehunga, on a commission for a Mr Alexander Alexander of Napier, Rawene operated as a fishing boat out of Ahuriri.

After the Napier Earthquake in 1931, Rawene was left high and dry on the newly formed mudflats, caused by the earthquake.  Mr Thomas Holden of Gisborne, on a visit to Napier thought she would make a good lake boat and purchased her and brought her to Waikaremoana, in 1931.

The Holden and Heggarty families spent many happy holidays at Waikaremoana on board Rawene.  In 1960 following the death of Mr Holden the boat was sold to the Chapman Brothers of Frasertown, who owned her for the next eight years.  Phillip de Lautour, who was then farming at Ohuka, purchased Rawene from the Chapmans about 1968 and eventually sold her to Walmsley Canning of Porangahau, April 1970.  On 11th September 1976 she was purchased by a partnership of Jock Ross and Evert Metz.  The Metz/Ross families still own her today.

She is currently in Tauranga undergoing a refit but will be back at Waikaremoana early in 2017.

Mr Coulthard’s son, who helped with her construction says they built an identical boat at the same time but he cannot remember her name – if anyone knows of a similar shaped hull we would be keen to hear more.  Originally Rawene didn’t have the raised roof at the stern or the poop deck these were added in about 1978.


It’s Hard to Find the Perfect Wife….

Unknown-1

Unknown

It’s Hard to Find the Perfect Wife….

……But woody Rod Prosser has. Over the last couple of years Rod has been acquiring a flotilla of classic woodys in various stages of restoration.

You may recall that he already owns ‘Firefly’ the 1882, 25’ counter stern day launch & the late 1950’s / 60’s Chev 327 V8 powered flat-bottom ski boat ‘Kiri Moana’.

Rod was doing a trademe troll & came across the old Lake Karapiro ski boat above, desperately looking for a new home. Given that Rod had a set of deck vents, step pads, windscreen supports, plus flags and other various other bits and pieces sitting on a shelf, in the garage, left over from when he was doing the Classic Craft boats way back & they would not suit the flat bottom ski boat – it seemed like a marriage made in heaven. Just needed wife Florence’s nod of approval & seeing that she had been asking what Rod was going to do with the bits, he suggested a family trip to Tauranga & surprise, surprise – came back owning the Karapiro boat.

As a bonus it came with a pretty rare Gray Marine AMC Rambler 327 Fireball V8 from the early sixties.

Even better news, Lake Rotoiti boat builder Alan Craig may have an old farm shed to store her until she gets her time in the sun.

So short, long story – Rod must have the perfect wife. 3 boats, that beats me.


2017 Centreboard Cup – 50 Photos

P1250800

2017 Centreboard Cup at the Herne Bay Yacht Club, Sloanes Beach

Raindance got a big 24hr workout at the weekend – Friday was the old mates lunch cruise to the Riverhead Pub, then back to Bayswater to drop the crew off & straight down to Waiheke Island for another mates dinner at the Oyster Inn. The nor-west puff put paid to anchoring in Oneroa so a quick call to Stephen Langton secured Kailua’s  mooring at Matiatia for the night.

The Oyster Inn was like a CYA gathering with several woodys there as well enjoying the late avo> evening sun on the deck – great to see Waimiga back in the water after some TLC, looking very sharp.

Up early & back to Auckland to catch the start of the Centreboard Cup. A good breeze ensured some lively racing. I was land based so could only focus on the pre-start > start. But I was perfectly placed to capture Corona’s rather embarrassing oops at the start with a boat-shed – they were over the line at the start (by a country mile) & came back, then it all went pear shaped – check out the slideshow below.

Hopefully someone captured some on-the-water racing photos that we can share on WW?

P1250875

This is the start of the oops, I suspect the skipper under estimated the length of the ramp, that was well submerged by a very high tide

This slideshow requires JavaScript.

Swiftsure – Restoration Project In-Waiting

Unknown-1

Swiftsure – Restoration Project In-Waiting  

I was recently contacted by Harold Kidd in regard to Swiftsure the 1921 centreboarder that needs major restoration and to the right person –  is free for collection.

Harold supplied some history on the yacht below.

SWIFTSURE was built by George McLean of Birkenhead in 1920 a bit under 16ft and a bit over 14ft (about 4 inches) because of the available lengths of timber.

Her first race appears to have been in November 1921 with the Ponsonby Cruising Club in their “14ft handicap class” i.e. not square-bilge and not Jellicoe Class 14s, owned by G. McLean. She was on scratch which indicates a first race. She raced consistently much of her life. She was registered with the 14ft T Class when the AYMBA introduced its alpha-numeric system in 1922. She was allotted T38.

By the 1923 Anniversary Regatta her oversize had apparently been picked up and she was moved to the 16ft S Class as S62. She was then owned by George’s nephew Ted Fitzgerald. After a protest she had the offending bit sawn off her stern and was reregistered as T6 in 1934. Later he put the 4 inches back on and she raced with the 16 footers as S62.

After he retired her from racing as an open boat post WW2 Ted built on a raised foredeck and a bigger cuddy.He took her on an annual cruise to Great Barrier with his two little girls. Amazing!

Swiftsure is now stored under cover at Beachhaven and stabilized but needs a total restoration. The above photo shows her racing as an S Class. Harold commented that it was hard to photograph her under her current shelter (see below bottom). The 1st group of photos below were taken some years ago before she deteriorated but give a good idea of her final, “cruising” configuration under Ted Fitzgerald’s ownership.

Interested parties can contact Harold via WW  or Grant Firth at gfirth1955@gmail.com

Unknown-9

RECENT PHOTOS

Spangalang

Unknown-1

SPANGALANG 4-Sale

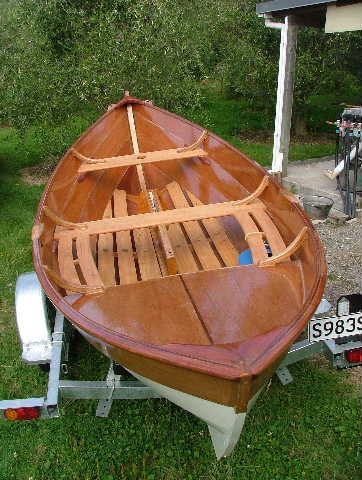
Back in 2012, in the days before waitematawoodys.com , I posted a story on the WoodenBoat magazines online forum about the building of Spangalang, a 14’6” Whilly sail boat, designed by Iain Oughtred.

She was built by Gary Drummond, who lives in Nelson & is the father of a good personal friend. Gary started the build in May 2011 & finished her in March 2012.

I followed the build with much interest & was amazed by Gary’s build quality & attention to detail. The boat won best new build at the Lake Rotoiti (Sth Island) classic boat show in 2012.

Last week I was contacted by Gary who sadly is having to look for a new owner / custodian for Spangalang. It’s not often that any Ian Oughtred craft pop up for sale in NZ & even rarer for one of this quality.

Interested parties could initially contact Gary via email    gvdrumdoon@gmail.com

I have reproduced Gary’s story on the build – it’s a good read – Enjoy.

PROJECT – WHILLY BOAT   (as told by Gary Drummond)

“This is my fourth boat project. For many years I have been looking for a suitable dinghy design and finally after checking out many designs settled on this one admiring the lovely sheer line. The other criteria was that it had to fit in my existing workshop. After cramming all my machinery in a huddle between two doors there was enough room including a fold down plan desk.

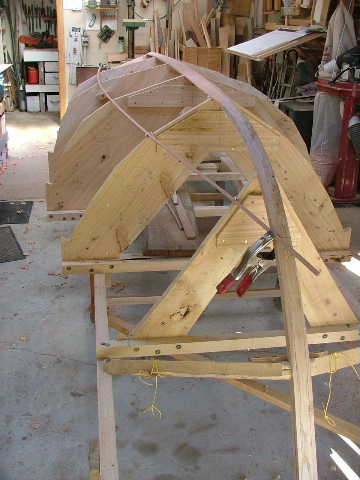
The frames were all 25mm dressed cypress fastened with reclaimed 65mm roofing screws and Titebond adhesive. The building frame was bolted to the concrete floor which allowed me to pack and level to adjust for the uneven floor  and a slight bow in the main 140×45 bed beams. All of the framing timber came from trees that we had planted years earlier in our small forestry block.

Screen Shot 2017-12-06 at 3.30.10 pm


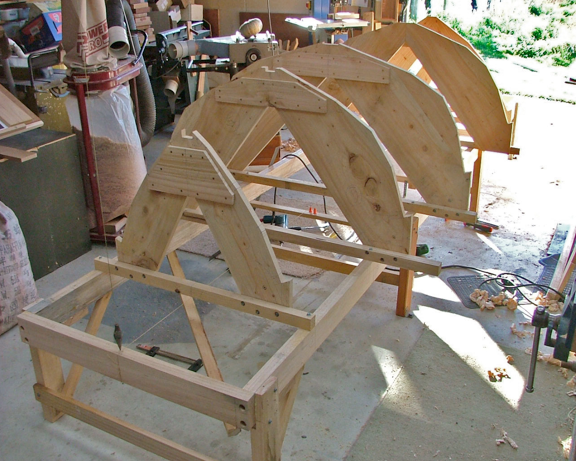
(Building frames setup)

DSCF3157

STEMS – The stems were laminated using Rock or Cork Elm (Ulmus thomasaii) as the timber was recommended for boatbuilding in Iain Oughtred’s book “Clinker Plywood BB Manual” and also in Clinker Boatbuilding by John Leather. I had previously flitched some trees we had growing on our creek bank and was aware on how well it bends. Not wanting to set up a steam box I first tried a wet soak for a day then clamping in the mould with additional spring chocks and left it to dry out. That was successful but it was quite easy to pull the laminates round the curve dry and clamp in place, so that was the method adopted. The building notes suggested a 3mm spring each end to the curve, but after release from the jig 5mm would have been better to allow for the relaxation or creep after gluing.

Screen Shot 2017-12-06 at 3.29.41 pm

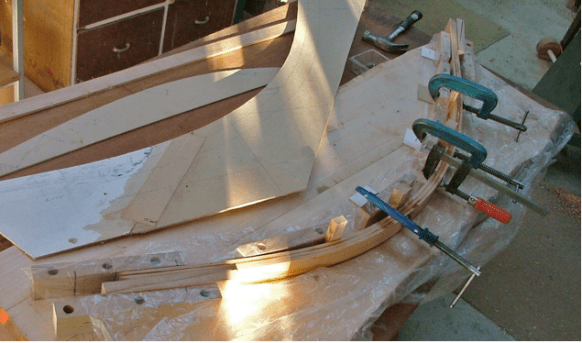
(Stem pre-soaked bending trial)

 PLANKING – I discussed plywood species and potential suppliers with two local boat builders and the recommendation was, “Meranti Ply” Part of our local coastline has beautiful golden sandy beaches compete with rocky granite headlands and submerged rocks, so reckoned a heavier garboard strake could be an advantage. I settled on the 9mm for the garboard and 6mm for the upper strakes. (8mm thickness is unavailable in NZ)

It was only when I was cutting out the garboard planks that I realised all laminates were not of the same species. On enquiry the suppliers comment was “Well 100% Meranti would be expensive and it is normal to have a mixed hardwood core” After all of my research on attributes of marine ply I had missed this one. A usual, don’t assume anything. The supplier was in another city so I didn’t see the ply before purchase. By comparison the 6mm ply appears to be 100% Meranti.

With some careful placement of the templates I managed to cut both of the garboard planks from one 2440×1220 sheet. Still I assume that is how it was supposed to be. I have been using my Hitachi jigsaw to cut out planks and have found that hollow ground Makita 2mm tpi blades give a good clean cut without the usual hairy edge.

Screen Shot 2012-03-11 at 11.50.53 AM

(Fastening the Garboard plank)

Bending the 9mm garboad plank to the stems seemed a bit of a mission for a start, until I devised a simple lever system with some short rope ends fastened through the frame one side, timber batten and light chain to hook over screw head fixed to each mould. This was especially useful when fixing the second plank, being unable to use clamps to the keelson. I have delayed fastening the ply until after the epoxy has set up for a couple of days and after trimming down to the stem-keelson surface. This was so I could locate a nail line that would be below my plane blade.

(Fastening the second Garboard plank 9mm+ ply)

 To locate the plank template and ply strake precisely in the same place each time for fitting and especially when at the glue stage I drilled two push fit holes for 50mm nails (minus heads) just below the 20mm joint through the template and into two of the station moulds. When I was happy with my template, marked and cut the paired planks about 2mm oversize (Not forgetting to drill the two location holes). Next I sandwiched the template between the two ply strakes and the faired the ply carefully to fit the template. On the second plank I glued the scarf as part of the plank gluing operation. The scarf was just clamped between two 40mm wide timber pieces without any location screws at the upper edge and to my horror after cleaning up and eyeing over the upper edge noticed a slight out of a  fair alignment. Oh well with a little luck it should take up with the fitting and fastening of the next strake. Just one temporary screw would have kept all in line. Oh bother.

For additional temporary fastenings in between clamps I have been using 30mm “Button Head” screws which worked well except for at the finishing stage having to plug the many screw holes. The plank scarf misalignment didn’t go away, I just had to rectify it before proceeding further it so purchased the second Japanese Saw without the backing rib, recut the epoxied scarf and also cut back 200-300 along the glue line between planks all to allow some movement. To ensure the correct fair line along the strake I cut and fitted a curved beam between the adjacent frames that I could clamp the re-cut scarf to achieve a fair line.

When fitting the outer stems, skeg and brass wear strips I made a sketch locating all of the screw locations to ensure when fastening the next layer I didn’t end up drilling a screw hole into an existing one below, however I did have one senior moment and had to move one hole.

This brings to mind the fragility of the posidrive square head silicon brass screws when forgetting to back off the torque setting on the drill. After shearing off a few I resorted to a hand held square driver for the final tightening.

The brass wear strips were, for better or worse polished and coated to minimise later tarnishing. When countersinking for the screw heads using a suitably reground 10mm twist drill the drill picked up the brass strip and a formed neat 10mm hole clean through. A moment of dilemma as I didn’t want to alter the screw spacing and have a spare hole. Anyway I didn’t check on the potential difference between brass and solder and soldered up the hole and started again this time with the strip in the drill stand vice. Since then I am told when modifying a twist drill for countersinking grind back the spiral cutting edge to near vertical so it is working with a scraping shearing action. This modification has since worked satisfactorily on some stainless steel.

Turnover – At Christmas time with the help from daughter Paula and two nephews we carried the hull out on the lawn and made the turnover, replacing it back on the build frame. I took care to reposition the hull exactly beneath my overhead centre line fixed to the roof truss collar tie and then set up a system of props and braces making sure all was vertical so I could make use of the level to align some of the interior components.

Interior Fitout – The mahogany strips for the gunwale needed scarf jointing in two places over the full length so set up a jig for cutting them on the circular saw which was quick and accurate, but in hind sight wonder if hand formed scarfs with the plane (once I got the hang of it) would have been just of quick. A lesson learned. I machined the qunwale strips to final dimensions, when I should have allowed say 3mm extra width for the final top trim of the four laminations incl, the ply sheer strake. To form the quarter round edges to the gunwale I cut them using the router hand held and inevitably left some black burn marks which would require a filler to disguise, so have left them as is just as a reminder of my folly.

Once again, sometimes a hand formed shape can be equally crafted successfully without the potential problems inherent in using power tools.

I formed the breasthooks from southern rata and the individual pieces when finally formed almost looked like small pieces of a sculpture. I opted for two 13mm oak dowels to reinforce the two halves. Setting up a jig on the lathe to drill the dowel holes was more of a challenge than making the dowel pins. Just this small operation to form and fit the two breasthooks ran away with three days.

Interior layout – Locally we have several tidal estuaries and a maximum high tide of some 4.8 metres and so decided on the pivoting centre board as being the best option for these conditions.  This option required the center thwart to be moved aft 200 mm. Next I decided to include the stern sheets (Aft decking) for which the forward bulkhead is positioned 150mm forward of station#6. Now, all of that was hopefully simple until you get in to start rowing only to find that with my 1.8m tall frame I couldn’t straighten my legs out for a comfortable rowing stance with the shortened cockpit length.

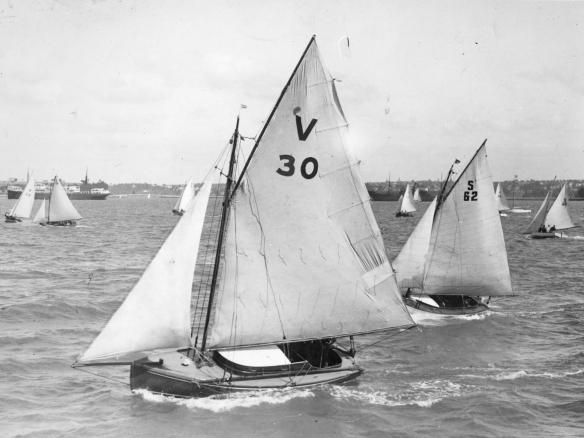
 Well at the Lake it wasn’t a problem to sit on the stern sheets and row looking forward and it also helped in keeping clear of all of the other canoes, yachts, skiffs, steamboats etc, during the drive past. To sort the problem, I have formed a shaped clip-on thwart extension that sits over the center case. The only potential problem being that the seating position will be further away from rowlocks requiring a bit more back bending when rowing.

Screen Shot 2012-03-21 at 3.24.02 PM

Protective Coatings – The complete hull firstly had two coats of West Epoxy. The exterior then had two prime coats, two undercoats, and two finish coats of paint, all wet and dry sanded I could only find one small flat on the second strake. Those final glossy finishes sure show up any earlier mistakes, and at that stage  too late to rectify just like the odd pencil line I failed to erase before applying the epoxy. The interior is all bright finish using a two pot varnish.The thwarts and floor boards received an matt oil finish with “Deks Olje”

Timber Spars – My idea was to obtain some unwanted spars and recut and reshape them to meet the requirements. Well what was a light rectangular boom to be formed into the yard, was after I had started splitting it longitudinally turned out to be a hollow spar and what initially was to be a simple say cut and re-glue turned out to be a little more complicated. On completion though I must say that it is light. A similar complication with the mast thought to be hollow as it was so light, I think it is spruce timber. After detailed checking of the diameter I found that it required widening in one direction to achieve the design. So it has ended up also as hollow spar. Next was the boom. A friend of a friend had a surplus oregan flagpole which after splitting it on the bandsaw and being careful not to cut it with a longitudinal wind managed to machine two suitable pieces from it. Having two hollow spars couldn’t resist now running the router along each piece to hollow them out. All went well but I will be holding my breath when under sail and the first big gust swoops in.

Screen Shot 2012-03-21 at 3.24.31 PM

 Rudder- I chose the swivel rudder option and it was all fairly straightforward until I came to choosing the gudgeon and pintals.  No one locally seemed to have anything like what I needed and I am now wary of purchasing fittings from the net as the nice pictures you see and the product you receive aren’t always the match your expectations. Anyway I drew up what I needed and had a Stainless Steel Fabricator make them without any fastening holes and extra length to allow for fitting modifications. There just aren’t that many double ended boats around to get any ideas from. Luckily there was sufficient room behind the formed pin holes to be able to redrill a set of new holes in a straight line for the pins with the pintal frame sitting snugly against the curved stem. I should have drawn them on the full sized on plan and then could have worked out the offset hole positions pre fabrication. Next time.

The Tiller is laminated cork elm with a 10mm hardwood dowel either side if the slot which fixes over the rudder head to ensure it doesn’t part company.

Choosing the name – With both sides of our family being of Scottish decent and the boat design coming from the Shetland Island the name just had to reflect all of this history. Firstly I scoured Celtic Scottish on line dictionaries and finally resorted to making contact with a relative from the Shetlands. He supplied me with a list and that was it.

Building Aids – Masking tape – should have used it more often to eliminate the many epoxy runs that are difficult to clean away under clamps.

Skarsten Scraper – great for removing epoxy runs and gauging grooves in the ply.

Steel Scraper – As well as straight I have made several with varying curvatures from old band saw blades.

Cam Clamps – Hadn’t seen one until I read Iain Oughtreds book, made a prototype and then a few more with a 200mm reach. Clamping pressure is not as great as a G Clamp, but is quite adequate for clamping glue jobs and just holding things.

Drawings  – These were good to work from, but, always read the fine print as I have in the rack a 1.97m half made boom. The actual Balanced Lugsail boom was 2.62m long.

Rigging – Iain Oughtred directs the builder to previously written articles, none of which I managed to locate. However on one of the many web searches via the site “The Mother of all Maritime Links”  http://www.boat-links.com  From this site I found just what I needed at,  http://www.storerboatplans.com/GIS/GISRigging.html

Now for some rope and fittings and we will finely be under sail on the water.

 Conclusion – This has been a great project and has drawn many favorable comments. Apart from the personal satisfaction of having created this thing of beauty it has been a great brain teaser. Every day there have been problems to solve such as how do I, set that out, clamp it, etc., etc.,. I am sure the brain has had a good workout and I will miss all of the challenges.

However, getting out on the water is going to be fantastic.”

DSCF3326